1. Installing Liquid on your project
Installing Liquid SDK on your project is very easy. Pick one of the following methods:
Install via CocoaPods Edit
- Install CocoaPods in your system.
- Open your Xcode project folder and create a file called
Podfilewith the following content:pod 'Liquid'. - Run
pod installand wait for CocoaPod to install Liquid SDK. From this moment on, instead of using.xcodeprojfile, you should use.xcworkspace.
For the watchOS only:
To install Liquid on a watchOS project, you should follow the same steps as for iOS, but also explicitly define the platform for each of your targets, in your Podfile, like shown below:
target 'ExampleApp' do
  platform :ios, '5.0'
  pod 'Liquid'
end

target 'ExampleApp WatchKit Extension' do
  platform :watchos, '2.0'
  pod 'Liquid'
end

target 'ExampleApp WatchKit App' do
  platform :watchos, '2.0'
  pod 'Liquid'
end

target 'Example TV App' do
  platform :tvos, '9.0'
  pod 'Liquid'
end
Install via Xcode Edit
-
Download/clone the latest version of Liquid SDK from https://github.com/lqd-io/liquid-sdk-ios in your project folder.
-
Drag
Liquid.xcodeprojto your Xcode project inside your project blue icon.
-
Open your project settings, select the tab Build Phases.
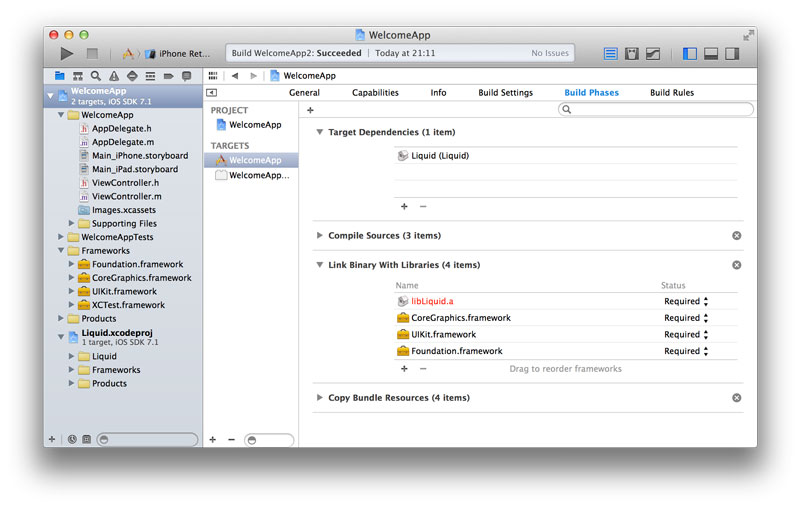
-
Open Target Dependencies, click “+” and select
Liquid. -
Open Link Binary With Libraries, click “+” and select
libLiquid.a. -
In your project settings, select the tab Build Settings.
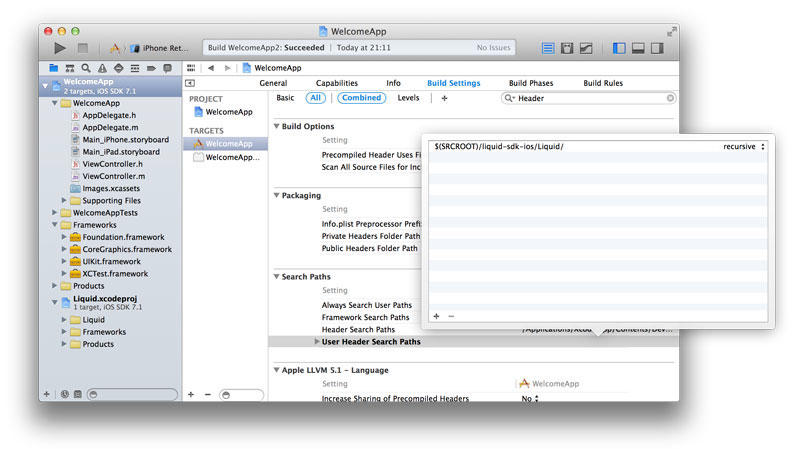
-
Search for User Header Search Paths and add
$(SRCROOT)/liquid-sdk-ios/Liquid(recursive). If you store Liquid SDK into another path, you should adapt that path to your situation. -
Search for Other Linker Flags and add
$(inherited) -ObjC -all_load -licucore.
Manual install Edit
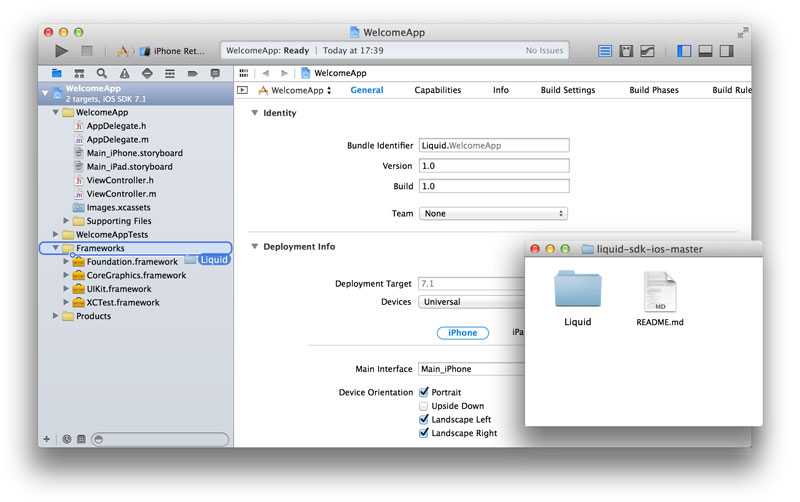
-
Download/clone the latest version of Liquid SDK from https://github.com/lqd-io/liquid-sdk-ios in your project folder.
-
Drag Liquid folder to your Xcode project.
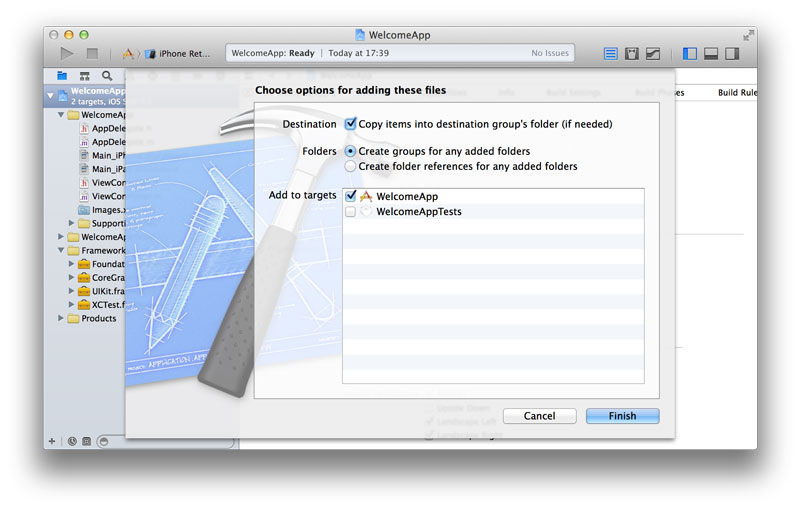
-
Select Copy items into destination Group’s folder and choose Create groups for any added folders.
-
(Only for watchOS) After this step, you should remove both XIBs from your watchOS targets. To do that, open Build Phases tab, then remove all
.xibfiles starting byLQ*in Copy Bundle Resources section.
2. Using Liquid SDK
The following steps will guide you on how to integrate Liquid on your project.
You should have #include "Liquid.h" at the beginning of every file that uses Liquid.
Initialize Liquid Edit
Important note
For every app you add on Liquid, two versions of the app are created: a production and a development version. These versions have completely distinct environments (i.e., different users, devices, sessions, events, targets and dynamic variables) and each app version has its own API key.
You can initialize Liquid singleton (once per app launch) with your app API key. Typically, the best place to do this is on application:willFinishLaunchingWithOptions: method at your AppDelegate.m file.
You can find your App API key on the App Settings of Liquid’s dashboard.
// AppDelegate.m

- (BOOL)application:(UIApplication *)application didFinishLaunchingWithOptions:(NSDictionary *)launchOptions {

  // assuming that you're using a DEBUG flag
  #ifdef DEBUG
    [Liquid sharedInstanceWithToken:@"YOUR-DEVELOPMENT-APP-TOKEN" development:YES];
  #else
    [Liquid sharedInstanceWithToken:@"YOUR-PRODUCTION-APP-TOKEN"];
  #endif

  // The rest of your code goes here...
  return YES;
}
From this moment on, each time you want to call a Liquid method you can do:
[Liquid sharedInstance];Note
All interactions using Liquid SDK should be done using this shared instance of Liquid object (and not using LQ* models).
Identify your users Edit
In order to keep track of a specific user between different sessions and devices (or different app installations) you must identify it with a unique identifier. This will allow you to use analytics based on their information.
This identifier is usually a strong UUID, e.g: "02318f2cdd156d78fd4431". We recommend using your back-end database ID to identify a user. Alternatively, you can use an email or username, provided they cannot be changed.
Tipically, you know more about your user than only his identifier. Liquid allows you to create analytics based on this information through Key-Value user attributes (on a NSDictionary).
For each of the above situations, you should identify your user with one of the following two methods, respectively:
// Only use this method on anonymous users.

[[Liquid sharedInstance] identifyUserWithIdentifier:@"UNIQUE-USER-ID"];
[[Liquid sharedInstance] identifyUserWithIdentifier:@"john.doe@gmail.com" attributes:@{ @"age": @35 }];
It is not mandatory to the user attributes at the moment of user identification. You can set their attributes later using setter methods.
Note
Liquid SDK keeps a cache of your previously identified user. This means that you don’t need to identify your user each time your app is open.
Anonymous users Edit
If you never identify your user, all activity will be tracked anonymously. As soon as a user is identified, all that anonymous activity will be automatically aliased to the identified user. This means that you’ll no longer see the anonymous user, but the identified one.
This process of user aliasing is automatic, is the default behavior and is higly recommended that you alias your users. However, if you don’t want this behavior, you may append the prefix alias:false when identifying your user, like shown in the following example:
[[Liquid sharedInstance] identifyUserWithIdentifier:@"john.doe@gmail.com" alias:false];Note
Our recommendation is to keep your users identified as much as you can, even after they logout. This will ease the analysis of their behaviour. However, if for any reason you really want to turn the SDK back to the anonymous state, you can use the method [[Liquid sharedInstance] resetUser]. This will create a new anonymous user (with a new Unique ID and no custom attributes). If your user is already anonymous, this will only wipe their attributes, leaving the unique_id intact.
Track events Edit
Probably the most important entity of analytics is an event. Events can be anything you want in the context of your application. It can be a click on a button, a product that is bought or any other interaction. Events are identified by a unique name, and can (optionally) have attributes (Key-Value).
Important note
Event names should have a minimum length of 3 characters and a maximum of 50. Also note that Liquid uses the attribute name to store the event name. If you set a custom event attribute with the key name it will be overrided by the SDK.
You can track an event anytime you want on your code, using one of the following methods:
[[Liquid sharedInstance] track:@"Click Profile Page"];
[[Liquid sharedInstance] track:@"Buy Product" attributes: @{ @"productId": 123 }];
Track your Monetization metrics
In order to take advantage of the Monetization section of the Dashboard view, you have to send a price attribute on your events, make sure to check the Monetization settings section for detailed information.
Track user attributes Edit
User attributes are Key-Value objects stored in the form of a NSDictionary.
Data types of these attributes can be: NSString, NSDate, NSNumber and NSNull. Primitive types are NOT allowed. Use objects only.
An example that includes all this attributes could be:
NSDictionary *userAttributes = @{
  @"name": @"Anna",
  @"woman": @YES,
  @"facebookId": @"123456789",
  @"age": @25
};
Usually you track these attributes when you identify your user, but you can also set those attributes anytime using one of the following methods, depending on the number of attributes you’re tracking:
[[Liquid sharedInstance] setUserAttribute:@25 forKey:@"age"];
[[Liquid sharedInstance] setUserAttributes:@{
  @"age": @25,
  @"name": @"Anna"
}];
Note
You should not store nothing more than user information on this collection, i.e. do not store information related with the device (like model or carrier). This information is stored on the device entity, as explained below.
Automatic device tracking Edit
Information about the user device is automatically saved by Liquid SDK.
You don’t need to worry about tracking information of the device. The following device attributes are always included on analytics (example):
{
  "App Name": "Wonderful App",
  "App Version": 1.4,
  "App Release Version": 1.4,
  "App Bundle": "io.lqd.wonderfulapp",
  "Vendor": "Apple",
  "Model": "iPhone4,1",
  "Device name": "John Doe's iPhone",
  "System version": 7.1,
  "System language": "en",
  "Locale": "en-US",
  "Screen size": "640x960",
  "Carrier": "Vodafone",
  "Internet Connectivity": "WiFi"
}
Track device location Edit
If you have information about user geolocation (a CLLocation) you can use Liquid to track device location. All you need to do is to inform Liquid SDK about current device location using the following method:
[[Liquid sharedInstance] setCurrentLocation:YOUR-CLLOCATION-INSTANCE];Liquid doesn’t automatically track location changes. This means you’re responsible to inform Liquid SDK each time device location changes. This is usually done in your CLLocationManagerDelegate delegated method, like:
- (void)locationManager:(CLLocationManager *)manager didUpdateToLocation:(CLLocation *)newLocation fromLocation:(CLLocation *)oldLocation {
    // The rest of your code...
    [[Liquid sharedInstance] setCurrentLocation:newLocation];
}
From this moment on, all data points sent to Liquid will include latitude and longitude attributes associated to Device entity.
Setup push notifications and in-app messages Edit
To send push notifications and in-app messages to your users’ through Liquid’s formulas you’ll just need three things:
-
Register for push notifications on Apple servers
-
Inform Liquid about each device’s APNS (Apple Push Notification) key.
-
Notify Liquid SDK to handle incoming push notifications
// AppDelegate.m

- (BOOL)application:(UIApplication *)application didFinishLaunchingWithOptions:(NSDictionary *)launchOptions {
    [application registerForRemoteNotificationTypes:(UIRemoteNotificationTypeAlert | UIRemoteNotificationTypeBadge | UIRemoteNotificationTypeSound)];
    return YES;
}

- (void)application:(UIApplication *)app didRegisterForRemoteNotificationsWithDeviceToken:(NSData *)deviceToken {
    [[Liquid sharedInstance] setApplePushNotificationToken:deviceToken];
}

- (void)application:(UIApplication *)application didReceiveRemoteNotification:(NSDictionary *)userInfo {
    [[Liquid sharedInstance] handleRemoteNotification:userInfo forApplication:application];
}
Configure APNS Certificate
To send Push Notifications as your App, Liquid must authenticate with Apple’s Push Notification Service (APNS) using your App’s certificate. Check the Setup push notifications certificates section to learn how to set it up on Liquid dashboard.
3. Dynamic variables (Liquid variables)
A Liquid Variable is a variable that holds a dynamic value which can change depending on rules that you define remotely on Liquid dashboard. You can transform any old-fashioned static variable into a Liquid Dynamic Variable just by replacing them with a Liquid method.
As an example, assume that you want to turn a static background color that was used like:
UIColor *bgcolor = [UIColor whiteColor];into a dynamic background color. You just need to replace it with something like:
UIColor *bgcolor = [[Liquid sharedInstance] colorForKey:@"loginBgColor" fallback:[UIColor whiteColor]];As soon as you compile your code and use this variable in your app, it will appear on your Liquid dashboard.
We recommend that you read our Fallback Variables Organization section.
Getting values for variables Edit
Based on variable names, Liquid returns values on six different data types: NSString, UIColor, NSDate, NSInteger, CGFloat and BOOL. These methods return the fallbackValue if the value is not present or valid.
- (NSString *)stringForKey:(NSString *)variableName fallback:(NSString *)fallbackValue;
- (UIColor *)colorForKey:(NSString *)variableName fallback:(UIColor *)fallbackValue;
- (NSDate *)dateForKey:(NSString *)variableName fallback:(NSDate *)fallbackValue;
- (NSInteger)intForKey:(NSString *)variableName fallback:(NSInteger)fallbackValue;
- (CGFloat)floatForKey:(NSString *)variableName fallback:(CGFloat)fallbackValue;
- (BOOL)boolForKey:(NSString *)variableName fallback:(BOOL)fallbackValue;
Fallback values Edit
You should always define fallback values for your dynamic variables. This will avoid strange behaviors in cases where your app is first launched without an Internet connection, but also if you accidentally delete a variable in Liquid dashboard, or define a different data type between your code and Liquid dashboard.
Each time you use a dynamic variable, you can define its fallback value using the fallback: suffix in Liquid KVO (Key-Value Observing) methods:
NSString *title = [[Liquid sharedInstance] stringForKey:@"title" fallback:@"Be welcome!"];
UIColor *bgcolor = [[Liquid sharedInstance] colorForKey:@"loginBgColor" fallback:[UIColor red]];
NSDate *promoDay = [[Liquid sharedInstance] dateForKey:@"promoDay" fallback:[NSDate date]];
NSInteger abTesting = [[Liquid sharedInstance] intForKey:@"loginVersion" fallback:3];
CGFloat discount = [[Liquid sharedInstance] floatForKey:@"discount" fallback:0.25];
BOOL *initialAds = [[Liquid sharedInstance] boolForKey:@"showAds" fallback:YES];
To ease the development process, each time you use a dynamic variable, its fallback value will be sent to Liquid dashboard and stored as default value (only when your app is compiled with Liquid in development mode).
Fallback values vs. targets Edit
If you use more than a variable for a Target (defined on Liquid dashboard), all variables affected by that target become dependant on each others.
This means that, if a variable value is fallen back, all the other variables on the same Target will be also fallen back.
Situations like these will only occur if you do something really wrong in your variable settings (e.g. data type mismatch between code and Liquid dashboard), but this mechanism will ensure consistency in your app.
Loading values Edit
Each time your app is open or closed/paused, new values are requested to Liquid. However, they are not immediately loaded by the SDK as it could cause strange behaviors in front of user eyes. By default, when new values are available, they will only be loaded the next time your app is open.
You can change this behavior just by setting autoLoadValues variable to YES after initializing Liquid singleton:
[[Liquid sharedInstance] setAutoLoadValues:YES];Asynchronous events and delegates Edit
Optionally you can be notified of Liquid internal internal events by implementing LiquidDelegate or NSNotificationCenter interface on your code, to take action when:
- When values are received from Liquid dashboard (not necessarily loaded)
- When values are loaded
Liquid triggers two types of notifications: LQDidReceiveValues and LQDidLoadValues corresponding both situations above.
Follow the steps for your prefered method to receive these notifications in your code.
via NSNotificationCenter
// ViewController.m

- (void)viewDidLoad {
  NSNotificationCenter *notificationCenter = [NSNotificationCenter defaultCenter];
  [notificationCenter addObserver:self name:LQDidReceiveValues
                         selector:@selector(newValues:) object:nil];
  [notificationCenter addObserver:self name:LQDidLoadValues
                         selector:@selector(loadValues:) object:nil];
  // The rest of your code goes here...
}

- (void)newValues:(NSNotification *)notification {
  // Do somthing, e.g: [[Liquid sharedInstance] loadNewValues];
}

- (void)loadValues:(NSNotification *)notification {
  // Do something with new variables, e.g: refresh a view
}
via LiquidDelegate
Because Liquid shared instance is a singleton, you can only set one of your objects as delegated to Liquid events.
As an example, let’s assume you want to delegate this events to one of your View Controllers. Your header file would be something like:
// ViewController.h

#import "Liquid.h"

@interface ViewController : UIViewController <LiquidDelegate>
and your implementation file would be like:
// ViewController.m

- (void)viewDidLoad {
  [super viewDidLoad];
  [[Liquid sharedInstance] setDelegate:self];
  // The rest of your code goes here...
}

- (void)liquidDidReceiveValues {
  // Do somthing with new values, e.g: [[Liquid sharedInstance] loadNewValues];
}

- (void)liquidDidLoadValues {
  // Do something with new variables, e.g: refresh a view
}
4. Recommendations and best practices
Fallback variables organization Edit
Most of the times, it is useful to have all dynamic variables and their fallback values in the same place.
This kind of practice not only improves code organization and readability, but also reutilization of static values in your code.
This way, we recommend you to create FallbackVariables.{h,m} files, like shown on the example below:
// FallbackVariables.h

#import <Foundation/Foundation.h>

@interface FallbackValues : NSObject

extern NSString *const defaultTitle;
extern NSString *const defaultBgColor;
extern NSString *const defaultPromoDay;
extern NSInteger const defaultloginVersion;
extern CGFloat const defaultDiscount;
extern BOOL const defaultShowAds;

@end
// FallbackVariables.m
#import "FallbackValues.h"
@implementation FallbackValues
NSString *const defaultTitle = @"Welcome to our app";
NSString *const defaultBgColor = @"#FF00FF";
NSString *const defaultPromoDay = @"2014-05-11T15:17:03.103+0100";
NSInteger const defaultloginVersion = 3;
CGFloat const defaultDiscount = 0.15f;
BOOL const defaultShowAds = YES;
@endBy doing this, you can now use dynamic Liquid variables like:
NSString *title = [[Liquid sharedInstance] stringForKey:@"title" fallback:defaultTitle];
NSDate *promoDay = [[Liquid sharedInstance] dateForKey:@"promoDay" fallback:[Liquid gettDateFromISO8601String:defaultPromoDay]];
UIColor *bgcolor = [[Liquid sharedInstance] colorForKey:@"textcolor" fallback:[Liquid colorFromString:defaultBgColor]];
NSInteger loginVersion = [[Liquid sharedInstance] intForKey:@"login" fallback:defaultloginVersion];
CGFloat discount = [[Liquid sharedInstance] floatForKey:@"discount" fallback:defaultDiscount];
BOOL showAds = [[Liquid sharedInstance] boolForKey:@"showAds" fallback:defaultShowAds];
while keeping a list of your dynamic variables and fallback values in one unique place.
Important note
Most of the times, you’ll want to make sure that your default values (in Liquid dashboard) are the same as the fallback values (in your code).
Setup push notifications certificates Edit
To send Push Notifications as your app, Liquid must authenticate with Apple’s Push Notification Service (APNS) using your app’s certificate. If you have one already, the steps you must follow are easy:
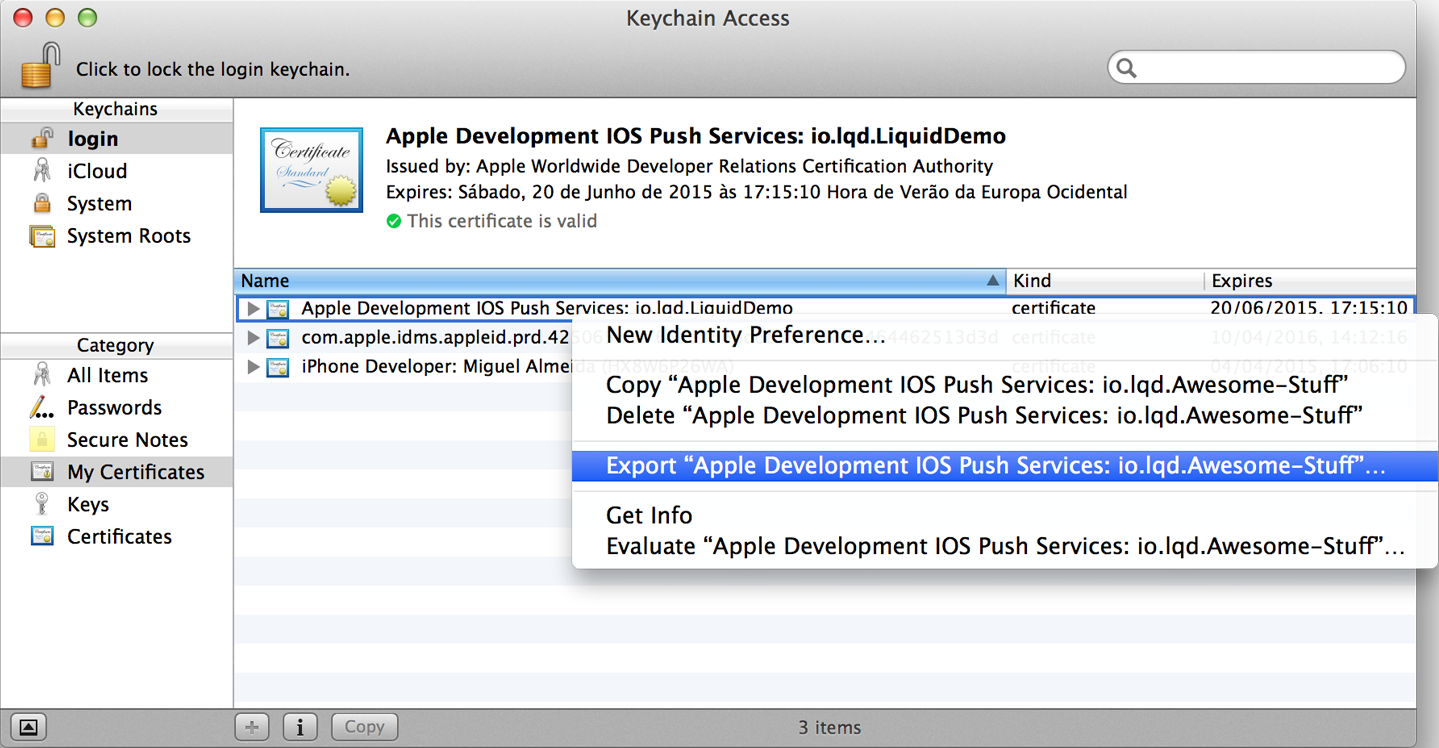
-
First, access your Mac’s Keychain and extract both your app’s certificate and private key. You should have each environment: production and development (sandbox):
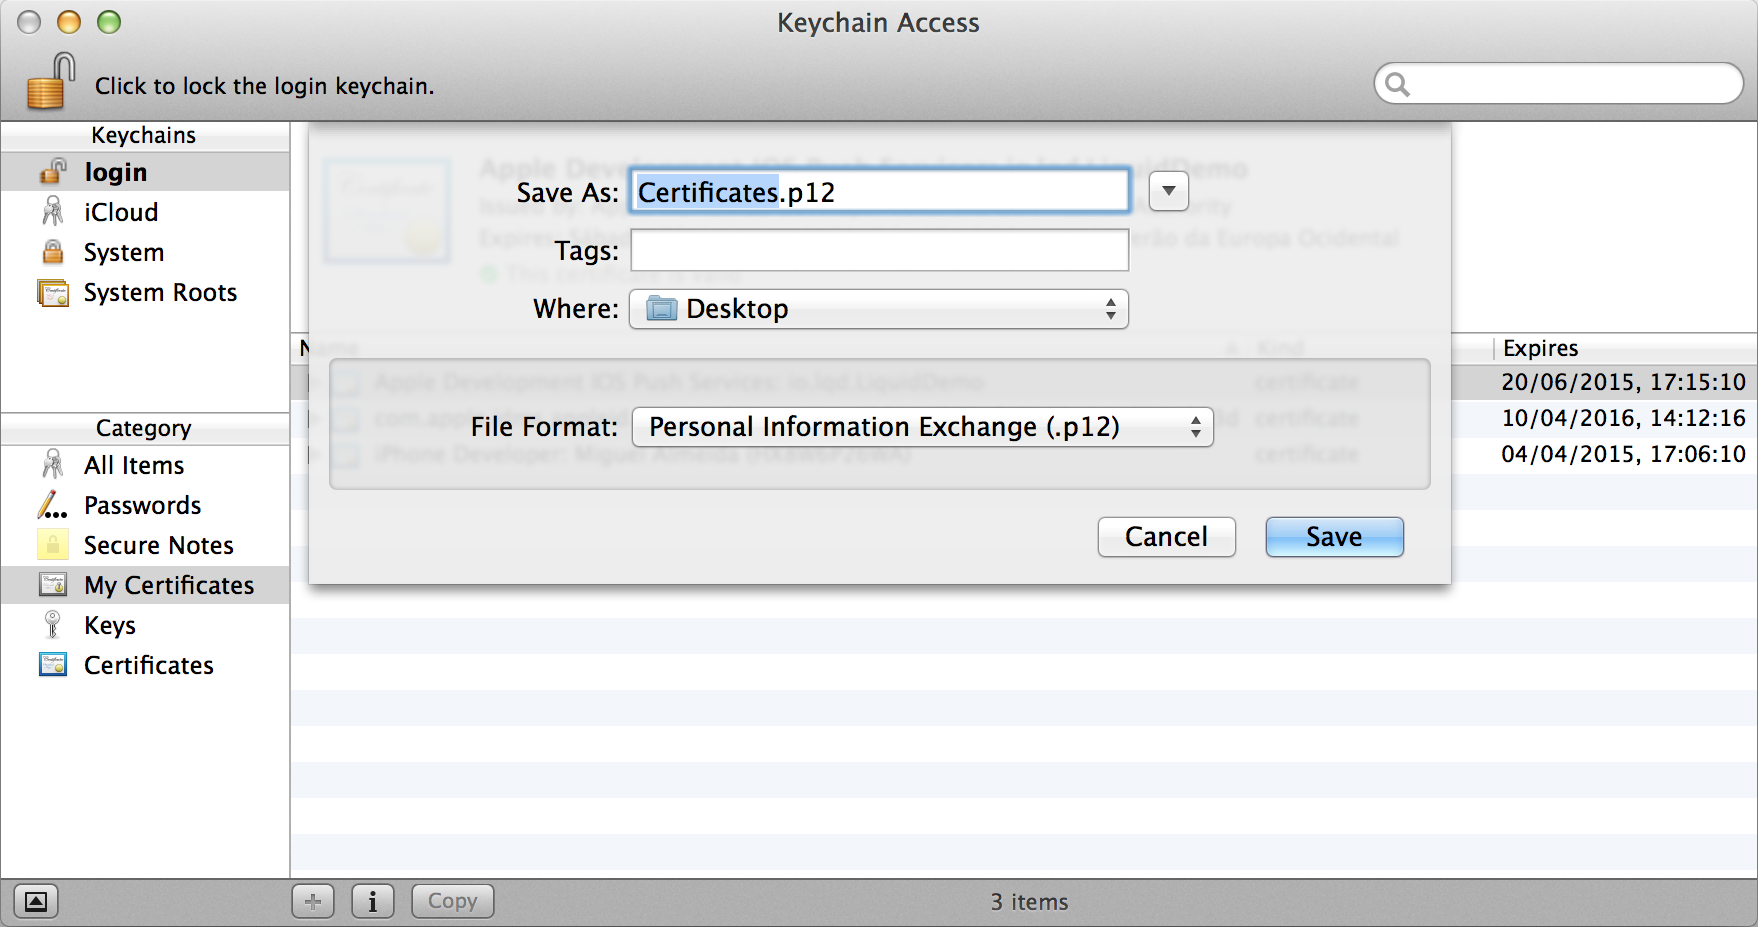
-
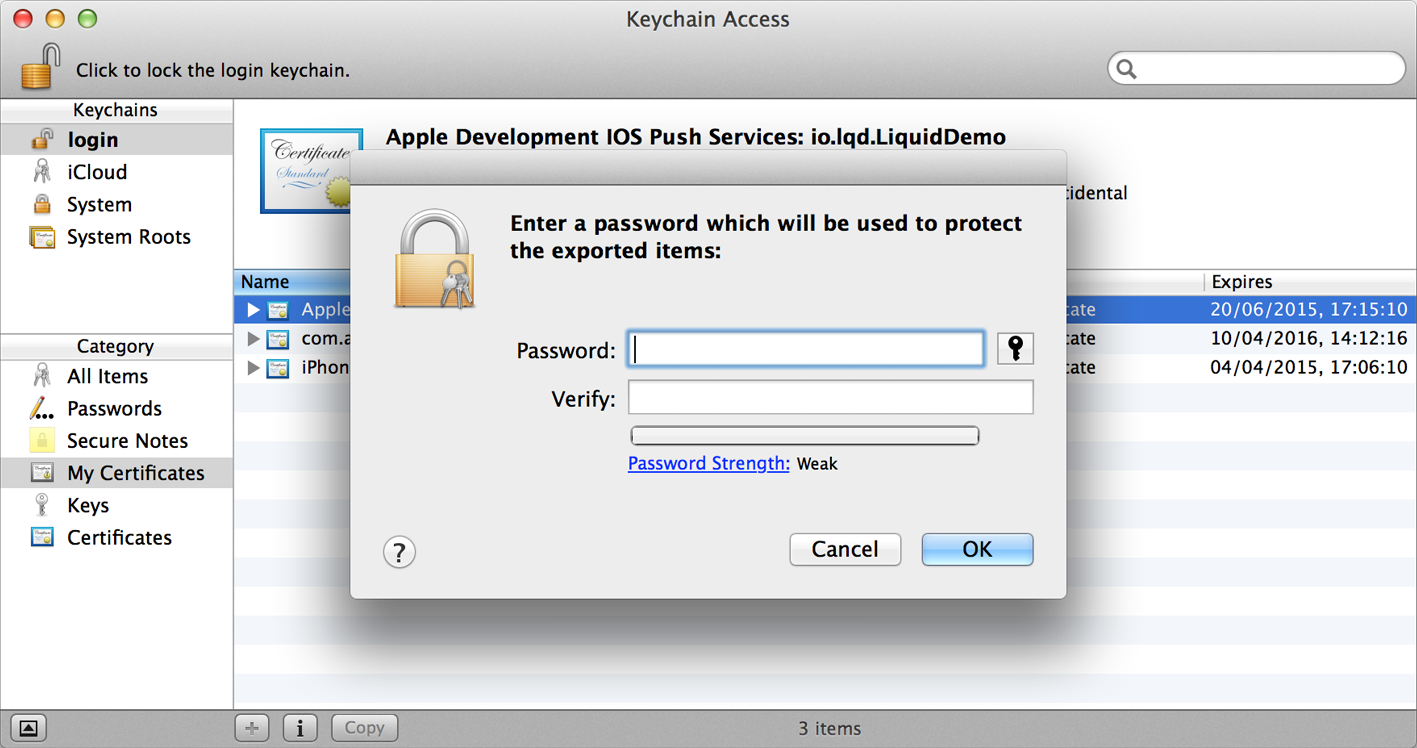
Extract it into the Personal Information Exchange (.p12) format and save it on your computer with any name you like. You can add a password but it is not required:
-
Go to your app Settings page in Liquid. In the Notification Settings section you can upload the Certificate you just extracted. Do so for your production and development app;
That’s it! You should now be able to send Push Notifications to your iOS users.
Monetization settings Edit
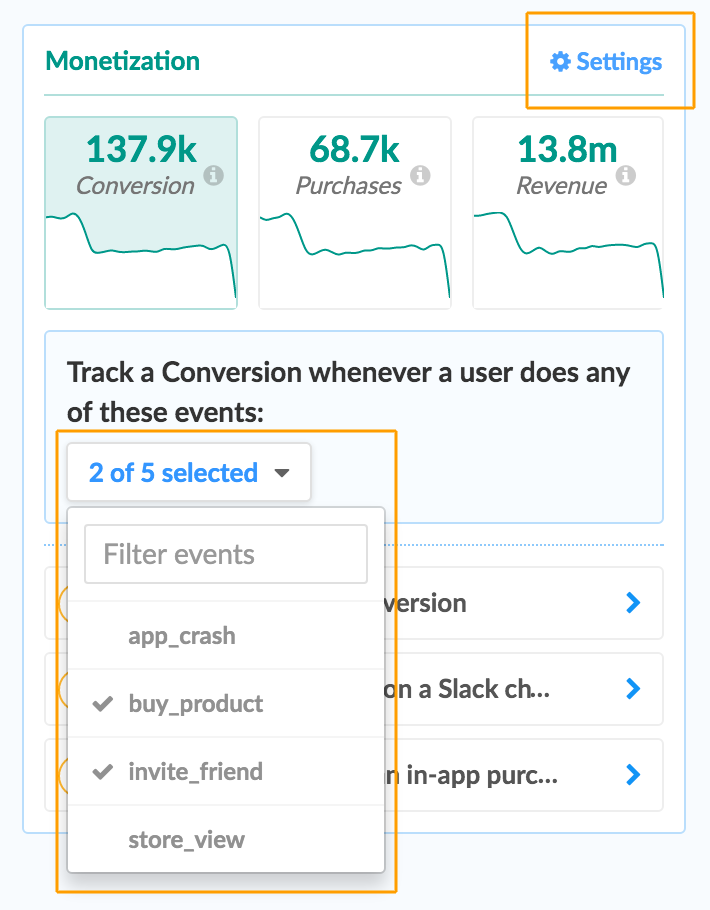
On the Dashboard section (check the demo) you will find your app’s Monetization metrics (Conversions, Purchases and Revenue) for the last 30 days. In order to set these values properly follow the guide bellow.
Conversions
A conversion can be any event (such as a purchase or a sign-up) that you consider important in the context of your app. You can pick up to 5 events and you’ll instantly get insights on how these events performed (converted) in the last 30 days:
- click on Settings and select up to 5 events that you consider to be a conversion
Purchases
Every event that has the attribute price is automatically considered a purchase.
An example would be:
// The price value must be an integer
[[Liquid sharedInstance] track:@"Buy Product" attributes: @{ @"price": 10 }];
Revenue
The sum of all values (integer) of the attribute price included on all events.
Setup AppsFlyer integration Edit
If you’re already using AppsFlyer in your app, you can view the user acquisition source on Liquid following this guide:
- On your app, after initializing our SDK set AppsFlyer customer user id to Liquid
device unique_id:
[[AppsFlyerTracker sharedTracker] setCustomerUserID:[[Liquid sharedInstance] deviceIdentifier]];- Select Liquid on the AppsFlyer integration menu, they’ll ask for your Liquid App key that is available in your app settings page.